Getting Started
Prerequisites
Filament reports is designed to be a simple, yet powerful reporting tool for your Filament application. So to begin with, you'll need to have a Filament application installed and running.
| Requirement | Version |
|---|---|
| PHP | ^8.1 |
| Laravel | ^10.0 |
| Filament | ^3.0 |
Installation
After you become a sponsor, you can install the package directly from GitHub.
This package is currently available for sponsors only, and when I reach 50 sponsors, it will be available for everyone. If you are interested in using this package, please consider sponsoring me on Github.
Add Repository
- Using Project URL
- Using SSH Key
Add the repository to your composer.json file. Using the project URL will require authentication when you require the package.
"repositories": [
    {
        "type": "vcs",
        "url": "https://github.com/eighty9nine/filament-reports.git"
    }
]
Add the repository to your composer.json file:
"repositories": [
    {
        "type": "vcs",
        "url": "git@github.com:eighty9nine/filament-reports.git"
    }
]
Require Package
Then require the package using composer:
composer require eighty9nine/filament-reports
Publish Assets
Publish the assets to your application:
php artisan filament:assets
Publish Config
Publish the config file to your application:
php artisan vendor:publish --tag=filament-reports-config
Usage
Include the plugin
Just like other filament plugins, first you have to link the plugin to your application. You can do this by adding the package to you plugin provider.
use EightyNine\Reports\ReportsPlugin;

public function panel(Panel $panel): Panel
{
    return $panel
        ->default()
        ->id('admin')
        ->path('admin')
        //...
        ->plugins([
            ReportsPlugin::make()
        ]);
}
Create your first report
To create your first report, the plugin includes a command to generate a report class for you. You can run the command using the following artisan command:
php artisan make:filament-report MyFirstReport
This will create a new report class in the app/Filament/Reports directory. The class will look like this:
<?php

namespace App\Filament\Reports;

use EightyNine\Reports\Report;
use EightyNine\Reports\Components\Body;
use EightyNine\Reports\Components\Footer;
use EightyNine\Reports\Components\Header;
use Filament\Forms\Form;

class MyFirstReport extends Report
{
    public ?string $heading = "Report";

    // public ?string $subHeading = "A great report";

    public function header(Header $header): Header
    {
        return $header
            ->schema([
                // ...
            ]);
    }


    public function body(Body $body): Body
    {
        return $body
            ->schema([
                // ...
            ]);
    }

    public function footer(Footer $footer): Footer
    {
        return $footer
            ->schema([
                // ...
            ]);
    }

    public function filterForm(Form $form): Form
    {
        return $form
            ->schema([
                // ...
            ]);
    }
}
Report structure
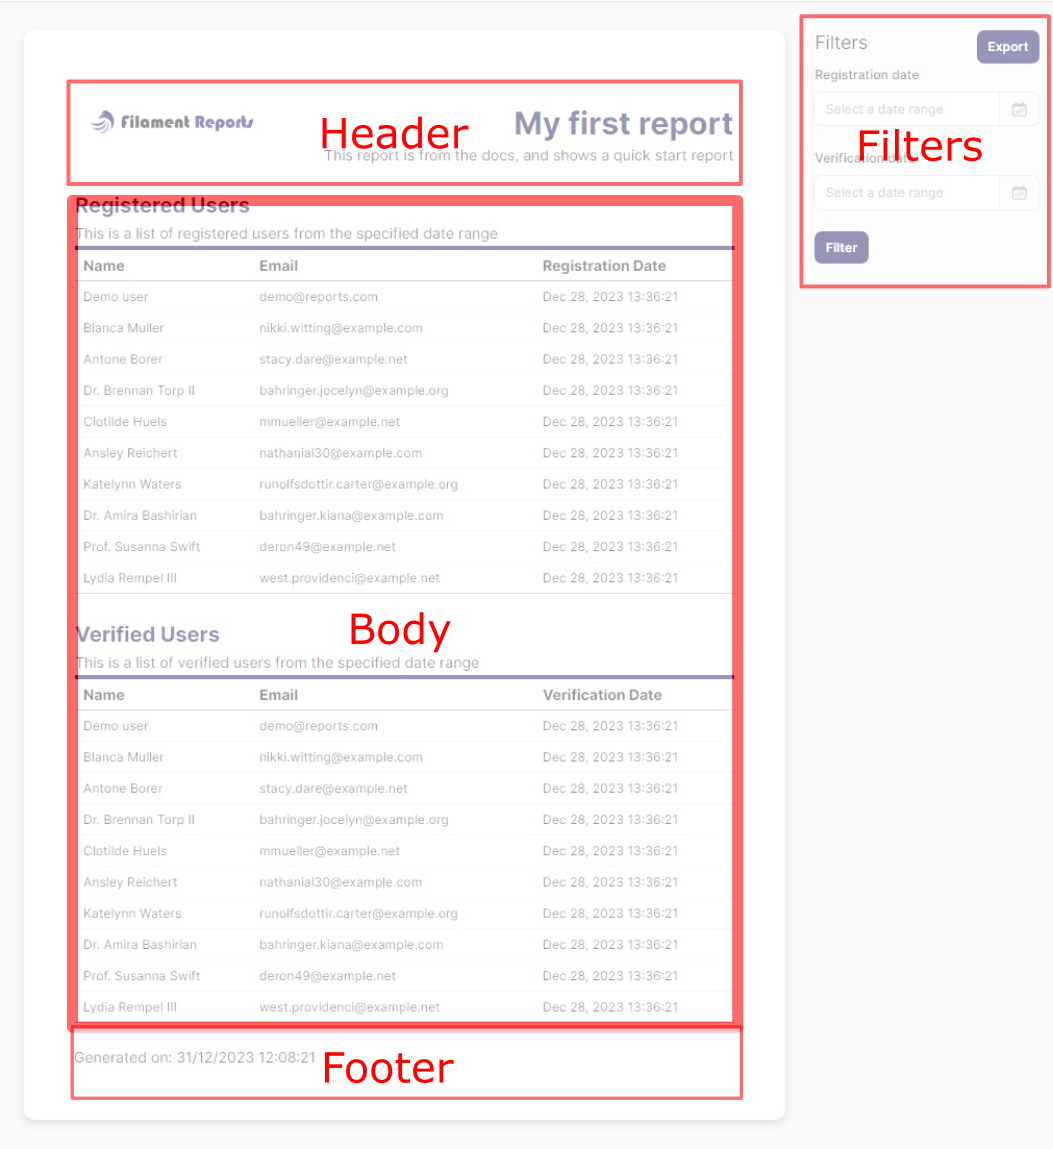
The report has the following sections:

Header
The header is the top section of the report, it can be used to display a title, subtitle, image and a description. If the section is left empty, nothing will be displayed, but if you have a custom header for your report, this is where you can define it.
The header area has layouts that can be used to arrange items. The layouts are HeaderColumn and HeaderRow.
HeaderColumnis a vertical layout, it will stack the items on top of each other. Items inside theHeaderColumncan aligned vertically and horizontally, depending on how you wish to align the items.HeaderRowis a horizontal layout, it will place the items next to each other. Items inside theHeaderRowcan be aligned vertically and horizontally, depending on how you wish to align the items.
The HeaderColumn and HeaderRow can be nested inside each other to create more complex layouts.
Apart from the Layouts, the header also has components that can be used to display data. The components are:
Text- This is used to display text, it can be used to display a title or a subtitle, or with any styling you may prefer.Image- This is used to display an image, it can be used to display a logo or any other image you may want to display.
Here is an example of the header section:
    public function header(Header $header): Header
    {
        return $header
            ->schema([
                Header\Layout\HeaderRow::make()
                ->schema([
                    Header\Layout\HeaderColumn::make()
                        ->schema([
                            Text::make("User registration report")
                                ->title()
                                ->primary(),
                            Text::make("A user registration report")
                                ->subtitle(),
                        ]),
                    Header\Layout\HeaderColumn::make()
                        ->schema([
                            Image::make($imagePath),
                        ])
                        ->alignRight(),
                ]),
            ]);
    }
Body
The body is the main section of the report, it can be used to display a table, chart or any other data. If the section is left empty, nothing will be displayed.
The body area has layouts that can be used to arrange items. The layouts are BodyColumn and BodyRow.
These behave the same as the HeaderColumn and HeaderRow but are used for the body section. But they are used specifically
for the body section, because they have different styling.
Apart from the Layouts, the body also has components that can be used to display data. The components are:
Table- This is used to display a table, it can be used to display a list of data.VerticalSpace- This is used to add vertical spacing between items.
The Text and Image components can also be used in the body section.
Here is an example of the body section:
    public function body(Body $body): Body
    {
        return $body
            ->schema([
                Body\Layout\BodyColumn::make()
                    ->schema([
                        Body\Table::make()
                            ->data(
                                fn(?array $filters) => $this->registrationSummary($filters)
                            ),
                        VerticalSpace::make(),
                        Body\Table::make()
                            ->data(
                                fn(?array $filters) => $this->verificationSummary($filters)
                            ),
                    ]),
            ]);
    }
Footer
The footer is the bottom section of the report, it can be used to display a title, subtitle, image and a description. It has layouts and components that behave the same as the header section.
The footer section has the Text and Image components, and the FooterColumn and FooterRow layouts.
    public function footer(Footer $footer): Footer
    {
        return $footer
            ->schema([
                Footer\Layout\FooterRow::make()
                    ->schema([
                        Footer\Layout\FooterColumn::make()
                            ->schema([
                                Text::make("Footer title")
                                    ->title()
                                    ->primary(),
                                Text::make("Footer subtitle")
                                    ->subtitle(),
                            ]),
                        Footer\Layout\FooterColumn::make()
                            ->schema([
                                Text::make("Generated on: " . now()->format('Y-m-d H:i:s')),
                            ])
                            ->alignRight(),
                    ]),
            ]);
    }
Filter Form
The filter form is used to filter the data that is displayed in the report. The filter form uses the Filament form builder
so you can use any of the form components that are available in Filament. The form is displayed on the side of the report, and the
filter data will be available in all the tables data() callback. This will be explained further in the below sections.
Example of a filter form:
public function filterForm(Form $form): Form
{
    return $form
        ->schema([
            Input::make('search')
                ->placeholder('Search')
                ->autofocus()
                ->iconLeft('heroicon-o-search'),
            Select::make('status')
                ->placeholder('Status')
                ->options([
                    'active' => 'Active',
                    'inactive' => 'Inactive',
                ]),
        ]);
}
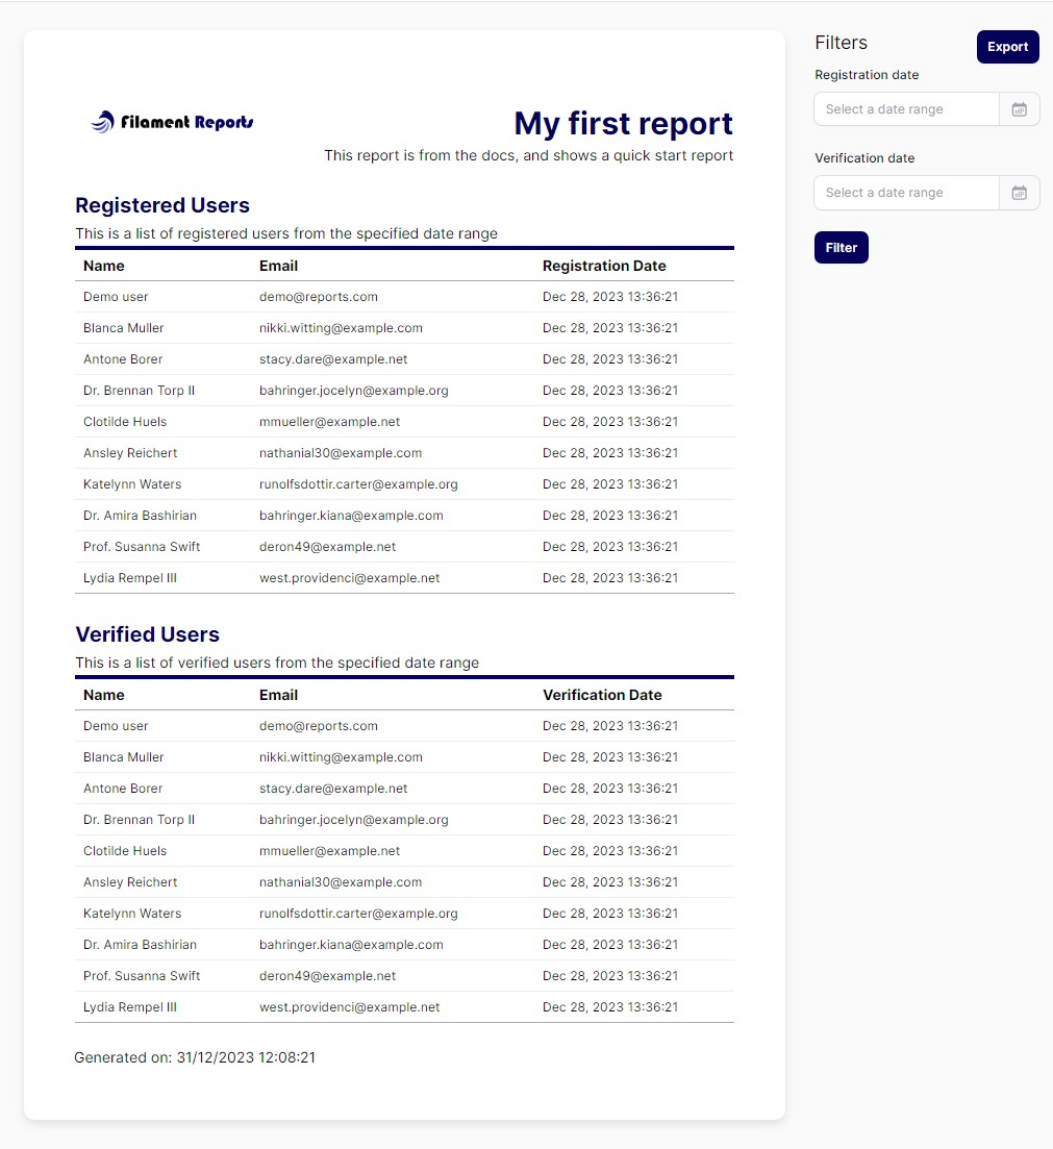
A sample report
Here is a sample report that uses all the components and layouts to create a report.

This sample report can be found at the Demo Site. And you can view its Source Code Here